
Every day we engage in some or the other activity, be it counting the calories consumed, steps climbed, the revenue our business generates or analyzing the growth of shares and income. It is very important in all these cases to measure our performance, as performance is a key indicator of growth.
When you create a WordPress website, more precisely – a business website, it is important that you choose the right WordPress hosting plan for it. Similarly, it is equally important to keep track of the website and ensure it delivers on the goal(s) you built it for. For instance, do you know what pages your customers view most or what it is about some pages, that they attract the maximum viewers? Analytics is what comes in handy at a time like this.
In this blog post, we’ll cover the most popular analytics platform i.e Google Analytics and how to add Google Analytics to WordPress.
What is Google Analytics?
Google Analytics is a web analytics service offered by Google to monitor and track your website’s incoming traffic from various sources. It is a freemium (free plus premium) service. It provides in-depth tracking of individual posts on the website/blog, different landing pages, sessions and performance reports to better track your traffic.
The Importance of Google Analytics
Google Analytics can primarily be used for;
- Measuring the traffic of your website in real-time and allowing you to compare data with different timelines
- Discovering not only the geographical region that your audience comes from but also their online source (social networking sites, direct or referrals) and the browser used.
- Noting the keywords used by visitors to your website. This gives you the most used keywords and you can use this data to optimize the posts on your website.
Steps to add Google Analytics to WordPress:
- Using a Plugin
Adding Google Analytics to WordPress is simple. All you need to do is follow the steps in this specific order:
Step I: Create a Google account and sign up for Google Analytics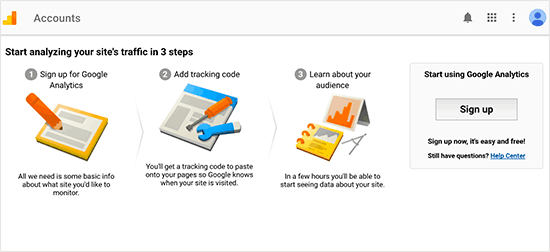
Step II: The next window will ask if you wish to setup Google Analytics for your website or mobile app. Since we want to install it on our WordPress site, we will select the website option.
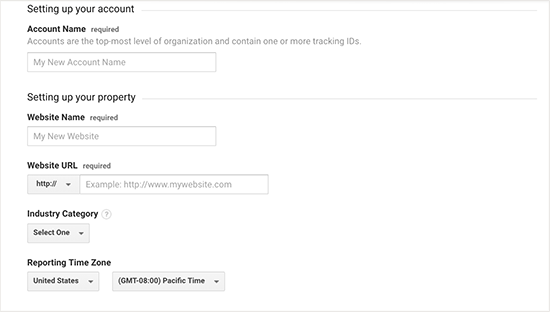
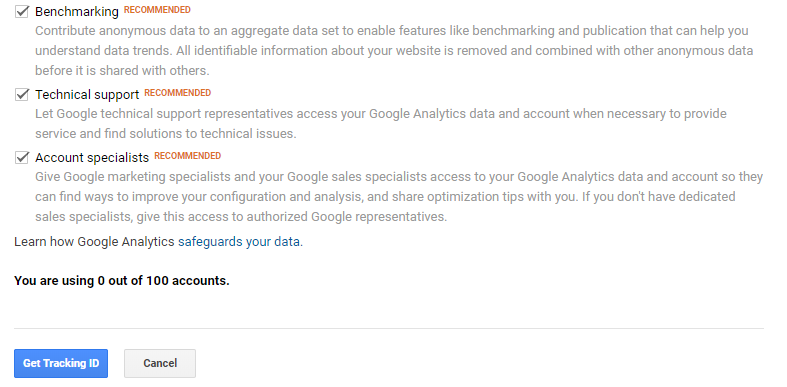
Step III: Scroll down the page and select the checkboxes you want. Finally, select the ‘Get Tracking ID’ button. This tracking ID will be added to our plugin on the WordPress site. The tracking code allows Google to track visitors to each page of your website.
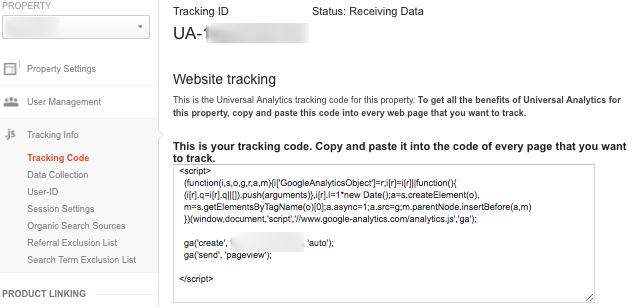
Step IV: Access Tracking ID
Now you’ll be presented with a code that you will need to insert into your WordPress website. Copy everything in the script tag and paste this code on the page you wish to track.
Note: I have hidden the tracking code for privacy purposes.
Step V: Adding the Plugin:
There are several Google Analytics plugins available for WordPress such as Google Analytics by ShareThis, MonsterInsights etc. However, ‘MonsterInsights’ is the most popular one with over 1+ million active installations. Download the plugin from the WordPress store and install it in your WordPress dashboard. This will help you add Google Analytics to WordPress.
Step VI: Activation
Once the plugin is activated, your WordPress dashboard will have a new item labelled as ‘Insights’. Click on that and then go to Settings. Here you will find a button saying, ‘Authenticate with your Google account’. Click this to connect your WordPress site to the Google Analytics account. You’ll be asked to verify your account and once this is done the plugin is activated.Step VII: Installation
Now you’ve successfully added Google Analytics to your WordPress website. It might take a while before your statistics are displayed. All you need to do whenever you wish to check it is to login to your Google Analytics account and see the stats of the page you wish to track. - Without Using a Plugin
Step I:
To add Google Analytics to your WordPress website without using a plugin is easy. Follow the above steps till Step IV: Access Tracking ID
Step II:
Next login to your WordPress site and click on ‘Appearance’ and then ‘Editor’. On the right-hand side, you will see a ‘Templates’ section. Under that, click on header.php
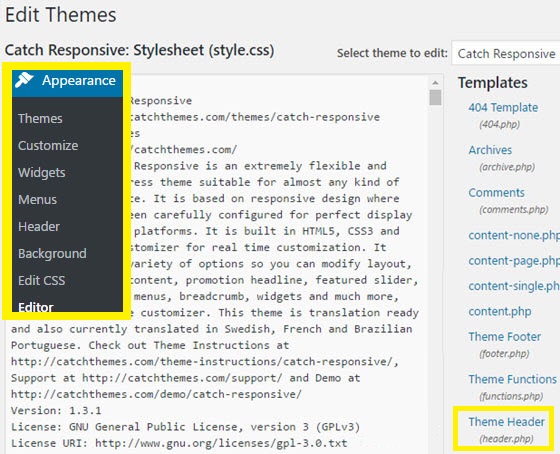
Step III: Paste the tracking code that you obtained from the earlier step after the body tag. Now click ‘Update file’. You would have now successfully installed Google Analytics on your WordPress website without an external plugin.
Step IV: You can now visit the Google Analytics dashboard and track the page you want after a while.P:S: In this case, when WordPress Update takes place, it will overwrite and remove the code and you need to manually do the changes all over again.
Testing Google Analytics
Once you’ve installed Google Analytics on your WordPress website, it may take around 24-48 hours for the traffic and reports to appear on your Google Analytics dashboard. In the meanwhile, it is essential to test whether it is working properly.
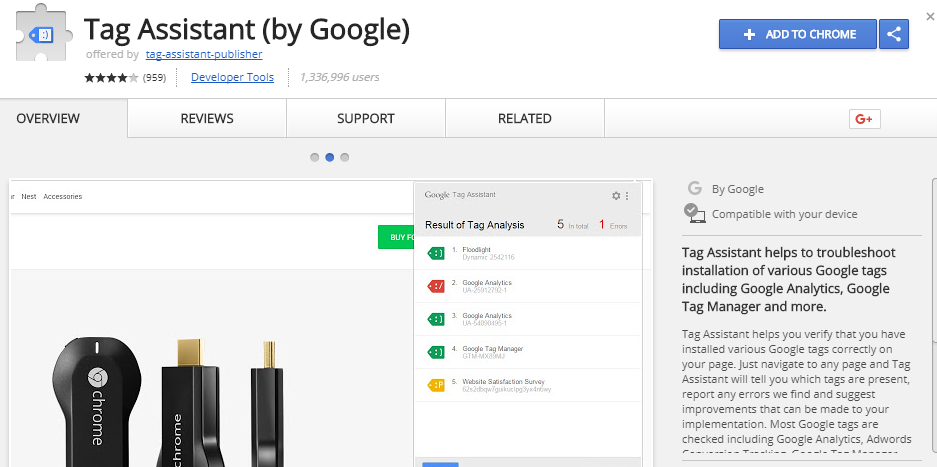
- Using Google Tag Assistant
Google Tag Assistant is a free Google Chrome browser extension that helps you to verify if Google Analytics has been set up properly.
Step I: Download Tag Assistant and add it to Chrome
Step II: Once the extension is added, click done.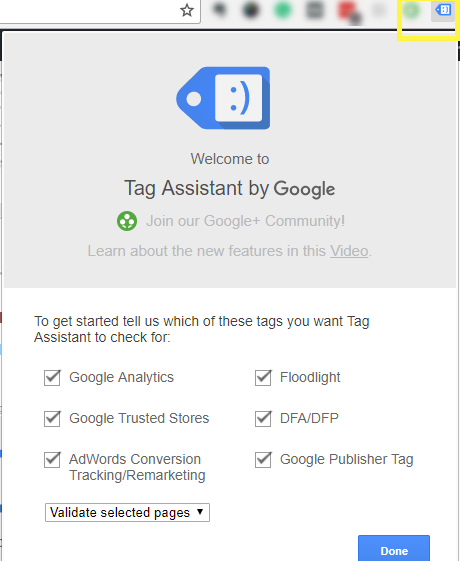 Step III: Next go to your WordPress website and click on the extension icon again. Then, click Enable.
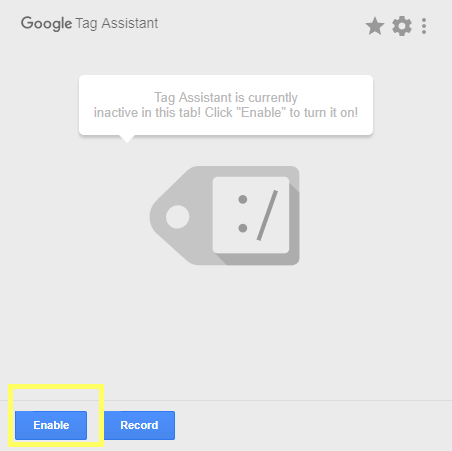
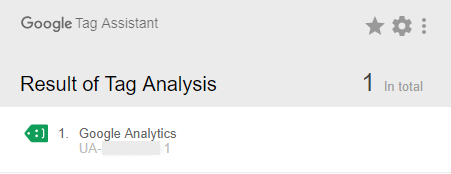
Step IV: Finally refresh your page. If your Google Analytics code is correctly installed, you will see your Tracking ID when you click the extension icon.
- Real-Time Reports
Tracking real-time reports are essential when it comes to measuring the performance of your WordPress business website. Some of the reports that help in this analysis are Traffic Acquisition report provides stats on how many people click on your ads, Landing Pages report tells you which page the user lands on first when they visit your website, New vs Returning report helps you keep a track on the frequency of your visitors among others.Follow these steps to view these real-time reports on your Google Analytics account.
Step I: Login to your Google Analytics account.
Step II: Navigate to the view where you have added your tracking code (since you’ve just begun you will have one view only)
Step III: Open Reporting, on the left side panel.
Step IV: Select Real-Time -> Overview or Real-Time -> Behavior, to find reports generated in real time. For non-real time reports as mentioned above you need to wait for 24-48 hours.
Conclusion:
Google Analytics is a good and effective way to track the visitors on your WordPress website and can help your business grow tremendously. We really hope you found this post informative.
If you have any queries on how to add Google Analytics to WordPress, feel free to leave us a comment below.
There is no ads to display, Please add some


